Getting Started
Set Up
To use AnotherAI's hosted service: go to https://anotherai.dev/ and sign up to create a free account.
Are you interested in a self-hosted, open-source set up? We have that too! You can learn how to get set up here.
Need an extra hand with the setup? We're happy to help. Reach us at team@workflowai.support or on Slack.
MCP
AnotherAI is available as an MCP server in the IDEs below.
Quick setup (recommended):
- Complete the set up steps above
- Tap on the button below
Manual installation:
- Open Cursor
- Go to
Settings... - Navigate to
Cursor Settings - Select
Tools and Integrations - Select
+ New MCP Server - Choose your authentication method:
OAuth Authentication (Recommended)
Add the following configuration to your MCP servers config:
{
  "mcpServers": {
    "AnotherAI": {
      "url": "https://api.anotherai.dev/mcp"
    }
  }
}- Return to the MCP Tools settings screen and enable the MCP, the indicator should be yellow with the message "Needs login".
- Tap "Need login", open the link and select "Allow" in your browser when prompted.
- Return to Cursor and the MCP should show as Connected (see screenshot below)
API Key Authentication
- Get your API key on anotherai.dev/ and add the following configuration:
{
  "mcpServers": {
    "anotherai": {
      "url": "https://api.anotherai.dev/mcp",
      "headers": {
        "Authorization": "Bearer <your_api_key_here>"
      }
    }
  }
}- Return to the MCP Tools settings screen. The Cursor UI should now look like this (note the green indicator and the number of tools enabled displayed):

- Complete the set up above
- Choose your authentication method:
OAuth Authentication (Recommended)
- Open Claude Code in your preferred terminal (standalone or within your IDE)
- Type the following to install:
claude mcp add --scope user --transport http anotherai https://api.anotherai.dev/mcp- Check that the server was added:
claude mcp list- Start Claude and authenticate:
claudeThen type:
/mcpNavigate to anotherai and press Enter. You should automatically be redirected to a browser to authenticate.
API Key Authentication
- Get your API key on anotherai.dev/
- Open Claude Code in your preferred terminal (standalone or within your IDE)
- Type the following to install:
claude mcp add --scope user anotherai https://api.anotherai.dev/mcp --transport http --header "Authorization: Bearer YOUR_API_KEY_HERE"Installation Scopes: The --scope user flag installs AnotherAI for your personal use across all projects. For team projects, you can use --scope project instead to create a shared .mcp.json file that can be committed to version control and shared with your team members. Learn more about MCP scopes in the Anthropic documentation.
- Type the following to verify the server is properly connected:
claudeThen type:
/mcp You should see the AnotherAI server listed as "connected".
Managing Large Experiments with Claude Code
If you're testing an agent that has a large system prompt and/or very long inputs, you may encounter token limit issues with the get_experiment MCP tool that impacts Claude Code's ability to provide accurate insights on your agent.

In this case, you can manually increase Claude Code's output token limit.
To set up permanently for all terminal sessions:
For zsh (default on macOS):
echo 'export MAX_MCP_OUTPUT_TOKENS=150000' >> ~/.zshrc && source ~/.zshrcFor bash:
echo 'export MAX_MCP_OUTPUT_TOKENS=150000' >> ~/.bashrc && source ~/.bashrcFor temporary use in current session only:
export MAX_MCP_OUTPUT_TOKENS=150000Notes:
- If you forget or don't realize you need to set a higher limit, you can quit your existing session, run the command to increase the limit, and then use
claude --resumeto continue your previous session with the increased limit applied.
You can learn more about tool output limits for Claude Code in their documentation.
Currently only available in beta to Pro and Plus accounts on the web. Refer to ChatGPT's documentation for more information.
-
Enable Developer Mode in ChatGPT:
- Go to ChatGPT
- Click on the user icon in the bottom left corner
- Select
Settings->Connectors->Advanced Settings - Toggle the
Developer Modeswitch ON
-
Add the AnotherAI MCP server:
- Go back to the main Connectors page
- Select
Create - Name the connector
AnotherAI - In
MCP Server URL, enterhttps://api.anotherai.dev/mcp - In
Authentication, make sure OAuth is selected - Select
Createto save the configuration
-
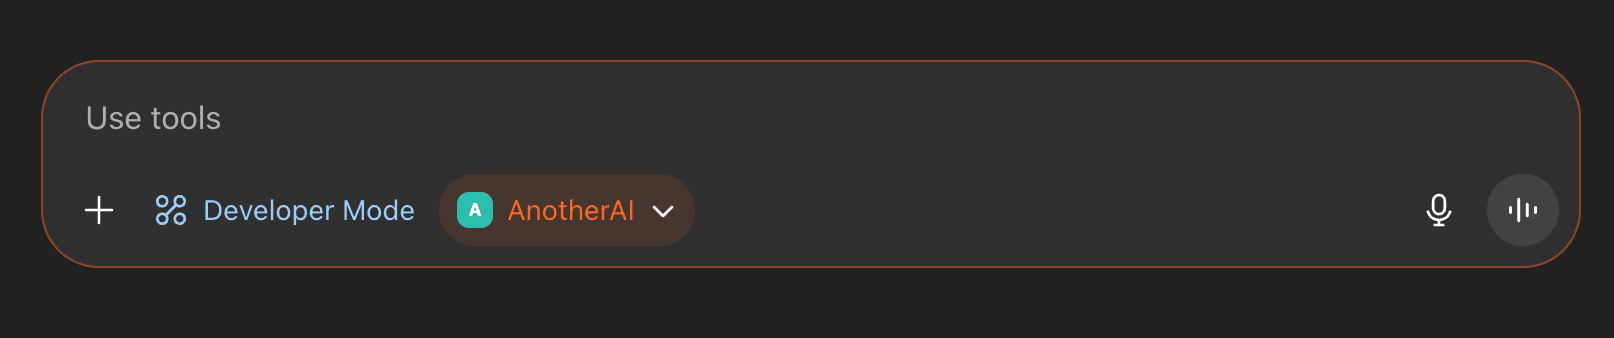
Using the AnotherAI MCP: you will need to manually enable the MCP server in a new chat to use it
- In the chat text box, select the
+->More->Developer Mode - You should see
Developer ModeandAdd sourcesappear at the bottom of the text box - Select
Add sourcesand toggle on AnotherAI
Once you've added the MCP server, it should look like this:
- In the chat text box, select the
- Open Windsurf
- Go to
Settings... - Select
Windsurf Settings - Navigate to
Cascade - Select
Manage MCPs - Select
View Raw Config
Add the following configuration to your MCP servers config:
{
  "mcpServers": {
    "anotherai": {
      "url": "https://api.anotherai.dev/mcp",
      "headers": {
        "Authorization": "Bearer <your_api_key_here>"
      }
    }
  }
}
Navigate back to Manage MCPs and refresh the page. The AnotherAI MCP should appear and show as enabled.
Cursor CLI can access MCPs configured in your IDE's mcp.json configuration file, enabling the same MCP servers and tools that you've configured for the IDE.
Setup steps:
- Complete the set up steps described above and ensure the AnotherAI MCP server is running
- Configure the AnotherAI MCP in your IDE's
mcp.jsonfile, as described in theCursortab. - Once the MCP is enabled and active, you can ask the Cursor CLI to interact with it
Additional Configuration: If you find that the CLI claims it can't find or use the AnotherAI MCP, you may need to give it the specific file path to use to look for the mcp.json file.
Codex stores the MCP configuration in a user scoped file located at ~/.codex/config.toml.
Remote MCP support is currently experimental so
experimental_use_rmcp_clientmust be set totruein the config.toml file. For now, the config file must be edited manually.
Then to add the MCP:
# Add the MCP to the config file
codex mcp add anotherai --url https://api.anotherai.dev/mcp
# Authenticate the MCP using OAuth
codex mcp login anotherai
The config file should look like:
experimental_use_rmcp_client = true

[mcp_servers.anotherai]
url = "https://api.anotherai.dev/mcp"
Try it out
After you have the above set up completed, AnotherAI is ready to use!
-
If you have agents already created, check out how to migrate them to AnotherAI.
-
If you don't have any agents built yet, check out building a new agent to learn about building a new AnotherAI-compatible agent.
How is this guide?